Quick Start with Linux Guest
This post shows all the comands and configuration files you need to build and run TinyVMI with Linux guest. Most of them can be used directly in your terminal on host machine(tested with Ubuntu 16.04, 18.04 as Dom0), while some fields need to be adjusted according to your build environment. For example, your working directory WORKDIR, logical volume group name vg0, iso image file path, etc.
Acknowledgment: This post is customized for TinyVMI based on instructions at DRAKVUF.
1. Install Xen
Compile and install Xen from given source code of xen-4.10.0, with XSM enabled. If already installed, go to Install Guest VM
mkdir WOKRDIR
cd WORKDIR/
# install prerequest for Ubuntu
wget https://gist.githubusercontent.com/cnlelema/5f14675364a47c6ffa7e34bb6d3ad470/raw/41cffdbc8d0c689e8d9ba78d886a215125d833d9/install-pre-ubu18-xen4.10.0.sh
sudo bash install-pre-ubu18-xen4.10.0.sh

# download Xen source
git clone --recurse-submodules https://github.com/tinyvmi/xen.git
cd xen


# configure xen
./configure --enable-stubdom --enable-systemd

# enable XSM support
make -C xen menuconfig
# Mark option
#   'Common Features -> Xen Security Modules support', and
#   suboption 'Compile Xen with a built-in security policy'.
# leave other option as is.

# compile & install Xen
make dist -jN  #set N to be number of cores/threads on your machine.
sudo make install

sudo systemctl enable xen-qemu-dom0-disk-backend.service
sudo systemctl enable xen-init-dom0.service
sudo systemctl enable xenconsoled.service

sudo ldconfig

# enable XSM flask in grub entry options

# backup
sudo cp /etc/default/grub /etc/default/grub-backup

# Add the following line to the file /etc/default/grub:
#     GRUB_CMDLINE_XEN_DEFAULT="dom0_mem=3096M,max:3096M flask=enforcing"
# This will be appended to the option of Linux kernel in the grub entry
sudo sed -i '/GRUB_CMDLINE_LINUX=/aGRUB_CMDLINE_XEN_DEFAULT=\"dom0_mem=3096M,max:3096M flask=enforcing\"' /etc/default/grub

sudo update-grub

# Finally reboot and choose Xen entry upon grub menu
sudo reboot
Select Xen to boot upon grub entry. After login, you can verify installation via:
sudo xl list -ZThe output should looks like:
Name                                        ID   Mem VCPUs	State	Time(s)   Security Label
Domain-0                                     0 10240     4     r-----     800.2 system_u:system_r:dom0_t
2. Install Linux VM and get Linux symbols.
You can either create a Windows VM or Linux VM as target VM to intropect from TinyVMI.
Install Linux as guest VM
Create logical volumn for Linux VM:
# create logical volumn
#   with
#   size 20G, name 'lvxenubu16', in volumn group 'vg0'
sudo lvcreate -L20G -n lvxenubu16 vg0
# verify the lv with its name and size
sudo lvdisplay
# outputs should include
    --- Logical volume ---
    LV Path                /dev/vg0/lvxenubu16
    LV Name                lvxenubu16
    VG Name                vg0
    LV UUID                iYpFmx-****-****-****-****-****-EmVmgM
    LV Write Access        read/write
    LV Creation host, time ruisrv, 2017-01-24 14:58:54 -0500
    LV Status              available
    # open                 0
    LV Size                20.00 GiB
    Current LE             5120
    Segments               1
    Allocation             inherit
    Read ahead sectors     auto
    - currently set to     256
    Block device           252:5
Create a configuration file use the following template:
# file ubuntu16.cfg
# ====
# HVM guest created from Windows ISO file
# ====

type = "hvm"
serial='pty'

# Guest name
name = "xen16a"


# Initial memory allocation (MB)
memory = 4096

# Maximum memory (MB)
maxmem = 4096

# Number of VCPUS
vcpus = 2

# Network devices
vif = [ 'ip=10.0.0.2,bridge=netbr0' ]

# Disk Devices
# change to your lv path and iso file.
disk = [ '/dev/vg0/lvxenubu16,raw,xvda,w','/media/iso/ubuntu-16.04-desktop-amd64.iso,,hdc,cdrom' ]

# Guest VGA console configuration, either SDL or VNC
#sdl = 1
vnc = 1

vncconsole=1

boot = "dc"
# uncomment this after installation, to avoid boot to iso
#boot = "cd"

# fix mouse cursor
usbdevice='tablet'

# XSM label
seclabel='system_u:system_r:domU_t'
Start VM to install Ubuntu 16.04:
xl create ubuntu16.cfgSetup Linux Symbols
After installaltion, get Linux kernel symbols and read offsets by running offset finder tool in guest. The offset finder tool is from the LibVMI.
First mount the logical volumn of the guest VM.
# assume the guest is installed in /dev/vg0/lvxenubu16
sudo fdisk -l /dev/vg0/lvxenubu16
output will show the sector size and start sector of the first partition:
Disk /dev/vg0/lvxenubu16: 20 GiB, 21474836480 bytes, 41943040 sectors
Units: sectors of 1 * 512 = 512 bytes
Sector size (logical/physical): 512 bytes / 4096 bytes
I/O size (minimum/optimal): 4096 bytes / 4096 bytes
Disklabel type: dos
Disk identifier: 0x488fbb03

Device                   Boot    Start      End  Sectors  Size Id Type
/dev/vg0/lvxenubu16p1 *        2048 39942143 39940096   19G 83 Linux
/dev/vg0/lvxenubu16p2      39942144 41940991  1998848  976M 82 Linux
Here we can mount the guest image using offset of start sector (2048) multiplied by sector size (512):
xl destroy xen16a
xl list
# make sure guest is not running

mount_offset=$(echo "2048*512" | bc)
echo $mount_offset

sudo mount -o loop,offset=$mount_offset /dev/vg0/lvxenubu16 mnt/

# Then copy libvmi/tools/linux-offset-finder to guest VM, and copy system map file to Dom0.

sudo cp -r libvmi/tools/linux-offset-finder /mnt/root/

# create directory to store system map and configuration files
# [suggested:] adjust the folder name according to your guest kernel version
mkdir example_target_u16_4.4.0_101_x64_test
cp /mnt/boot/System.map-4.4.0-101-generic example_target_u16_4.4.0_101_x64_test/

sudo umount /mnt
Then convert system map to C string:
cd example_target_u16_4.4.0_101_x64_test/
xxd -i System.map-4.4.0-101-generic > target_libvmi_sym.c
Then, create new file target_libvmi_sym.h with the following code:
// file: target_libvmi_sym.h
#ifndef TARGET_LIBVMI_CONF_SYM_H
#define TARGET_LIBVMI_CONF_SYM_H


/**
* define linux_system_map_string for Linux
* change this if use another system map
* all the System_map_* variables are declared here, and
* defined at file /tiny-vmi/config/target_libvmi_sym.c
* the definition is generated by xxd command which coverts a file
* to ASCII string codes: xxd -i System_map_*
*/

#ifndef SYM_FILE_FROM_STRING
#define SYM_FILE_FROM_STRING
#endif

#ifdef REKALL_FILE_FROM_STRING
#undef REKALL_FILE_FROM_STRING
#endif

#define linux_system_map_string System_map_4_4_0_101_generic
#define linux_system_map_string_len System_map_4_4_0_101_generic_len

extern unsigned char System_map_4_4_0_101_generic[];
extern unsigned int System_map_4_4_0_101_generic_len;


#define linux_system_map_string_SRC_FILE "string"

#endif // TARGET_LIBVMI_CONF_SYSMAP_H
Replace variable System_map_4_4_0_101_generic and System_map_4_4_0_101_generic_len as needed.
You can run head target_libvmi_sym.c and tail target_libvmi_sym.c to find the names.
Now boot linux, in guest VM, run with root:
root@guest: $ cd /root/linux-offset-finder/
root@guest: $ make
root@guest: $ insmod findoffsets.ko
root@guest: $ rmmod findoffsets
root@guest: $ dmesg | tail

# output should be similar to
[  490.682638] findoffsets: module verification failed: signature and/or  required key missing - tainting kernel
[  490.683879] Module FindOffsets  loaded.
[  490.683879]
[  490.683891] [domain name] {
[  490.683896]     ostype = "Linux";
[  490.683901]     sysmap = "[insert path here]";
[  490.683907]     linux_name = 0x600;
[  490.683912]     linux_tasks = 0x350;
[  490.683917]     linux_mm = 0x3a0;
[  490.683922]     linux_pid = 0x448;
[  490.683927]     linux_pgd = 0x40;
[  490.683931] }
Copy the offset output into the WORKDIR/example_target_u16_4.4.0_101_x64_test/libvmi.conf file in dom0, be sure to update the domain name:
# file example_target_u16_4.4.0_101_x64_test/libvmi.conf
xen16a{
   ostype = "Linux";
   sysmap = "string";
   linux_name = 0x600;
   linux_tasks = 0x350;
   linux_mm = 0x3a0;
   linux_pid = 0x448;
   linux_pgd = 0x40;
}
Next, convert the configuration file into C string.
cd example_target_u16_4.4.0_101_x64_test/
xxd -i libvmi.conf > target_libvmi_conf_file.c
Then mv the configuration files to TinyVMI and create symblic link in TinyVMI source:
mv example_target_u16_4.4.0_101_x64_test/ xen/stubdom/tinyvmi/tiny-vmi/config/target_conf_examples/
# go to dir WORKDIR/xen/stubdom/tinyvmi/tiny-vmi/config/target_conf
# and remove old links
cd xen/stubdom/tinyvmi/tiny-vmi/config/target_conf/
rm *
# create symbolic
ln -s ../target_conf_examples/example_target_u16_4.4.0_101_x64_test/* .
Update DOMAIN_NAME in file xen/stubdom/tinyvmi/include/domain_id.h. For example:
#ifndef DOMAIN_ID_H
#define DOMAIN_ID_H

#define DOMAIN_NAME "xen16a"

#endif // DOMAIN_ID_H
3. Compile and run TinyVMI
Now we are ready to compile and run TinyVMI
Adjust the Xen configuration file use the template at WORKDIR/xen/stubdom/tinyvmi/domain_config:
# file xen-src/stubdom/tinyvmi/domain_config
# Change fileds accordingly

# Kernel image file.
kernel = "mini-os.gz"

# Initial memory allocation (in megabytes) for the new domain.
memory = 64

# A name for your domain. All domains must have different names.
name = "TinyVMI"

# network connection
vif = ['ip=10.0.0.100,bridge=netbr0' ]

on_crash = 'destroy'

seclabel='system_u:system_r:domU_t'
You might need to adjust the network configuration accordingly, i.e. giving a valid IP address and network bridge name on your domain 0.
cd WORKDIR/xen/stubdom/tinyvmi
sudo bash run.tiny.sh buildrun
Then you’ll get outputs like:
Xen Minimal OS!
    start_info: 0xf6000(VA)
    nr_pages: 0x2000
    shared_inf: 0xa0278000(MA)
        pt_base: 0xf9000(VA)

....

[main] IP 0 netmask 0 gateway 0.
[main] TCP/IP bringup begins.
Thread "tcpip_thread": pointer: 0x0x200000002170, stack: 0x0x2f0000
[tcpip_thread] TCP/IP bringup ends.
[main] Network is ready.
"main"
VMI_TEST: Hello, world!
VMI_TEST: main: TimeStamp: 1531894244 s 473686 us
VMI_TEST: main: TimeStamp: 1531894246 s 483747 us
evtchn_open() -> 4
xenevtchn_bind_interdomain(1, 6) = 0
VMI_TEST: LibVMI init succeeded!
VMI_TEST: Waiting for events...
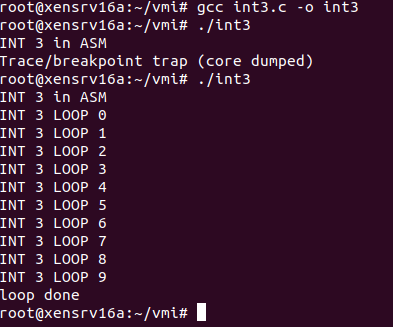
Create a file with the following C code in Linux guest VM:
// int3.c in Linux guest
#include <stdio.h>
#include <unistd.h>

void loopasm(){
    __asm__("int $3");
}

int main(){
    printf("INT 3 in ASM\n");
    for (int i = 0; i< 10; i++){
        Sleep(2);
        loopasm();
        printf("INT 3 LOOP %d\n", i);
    }
    printf("loop done\n");
    return 0;
}
Compile and run it:
gcc int3.c -o int3
./int3
Then on the output of TinyVMI, should like:
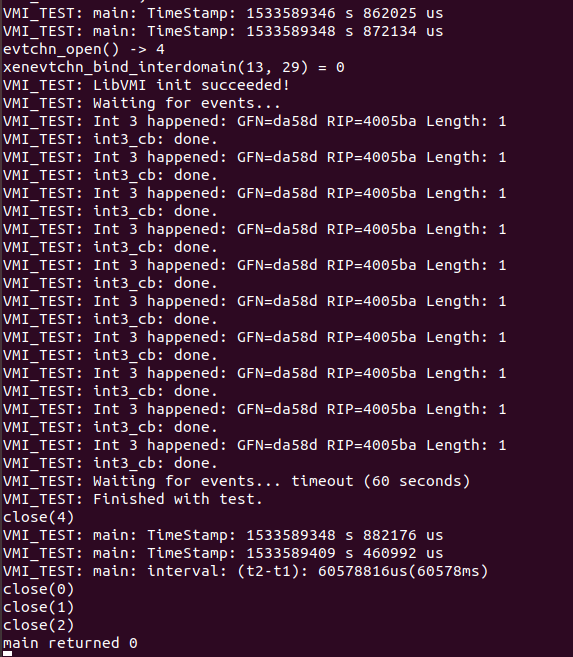
We can see the int 3 instruction running in Linux guest is caught by TinyVMI.